
The Connect Solar Panel Standard and Why Every Brand Uses a Different Plug
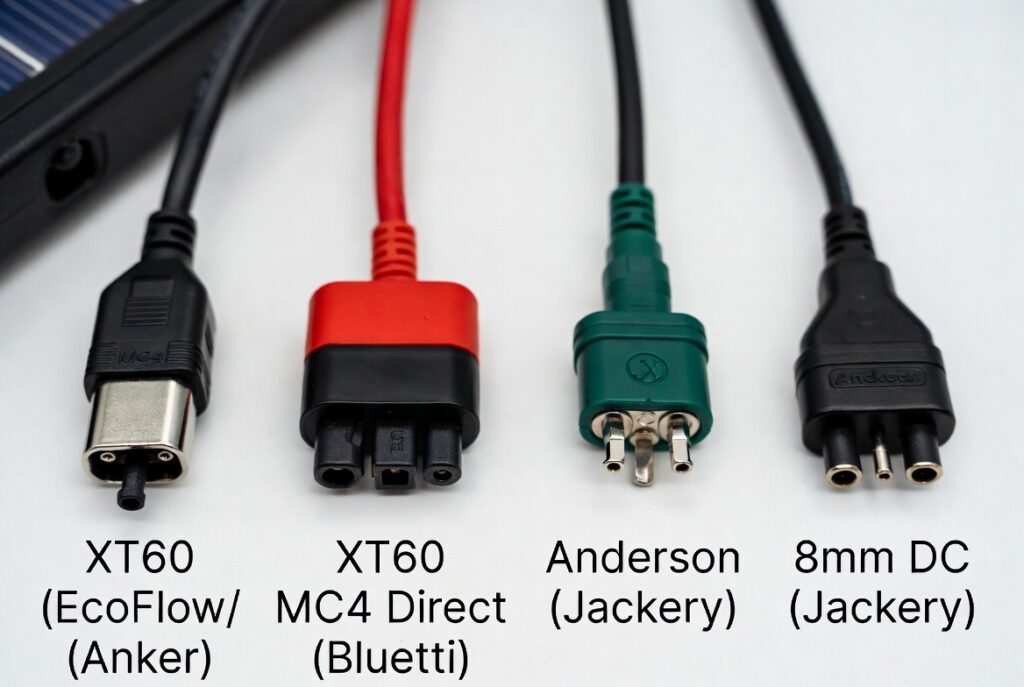
Learning how to connect solar panel leads to your portable generator is the final step between owning backup power and actually charging it from the sun. Most solar panels use universal MC4 connectors. Most generators do not. EcoFlow uses XT60. Jackery uses Anderson or 8mm DC barrel. Bluetti uses MC4 direct or an aviation plug. You need the correct adapter cable for your specific brand.
The connection itself takes under 5 minutes. The mistakes that damage equipment happen in seconds. Reversed polarity fries the charge controller input. Exceeding the generator’s maximum input voltage trips the safety breaker or permanently damages the circuitry. Both mistakes are preventable with a $15 multimeter and 30 seconds of verification before the final connection.
This article covers the connector type for each major brand, the 3-step connection sequence, the voltage check that prevents overvoltage damage, and the Ontario cold-weather voltage spike that catches DIYers every winter. For a broader overview, see our solar generator Ontario guide.
The Connector Type Table by Brand and Which Adapter Cable You Need
Every solar panel manufacturer uses MC4 connectors on the panel side. The difference is on the generator side. Each brand uses a proprietary input port that requires a specific adapter cable. Buying the wrong adapter means the plug does not fit. Buying a cheap unbranded adapter means the polarity may be reversed internally.
| Generator Brand | Input Port Type | Required Adapter |
|---|---|---|
| EcoFlow | XT60 or XT60i | MC4 to XT60 |
| Anker | XT60 | MC4 to XT60 |
| Bluetti | MC4 direct or aviation plug | MC4 direct or aviation adapter |
| Jackery | Anderson or 8mm DC | MC4 to Anderson or 8mm |
Bluetti is the only major brand that accepts MC4 connectors directly on some models, which eliminates the need for an adapter cable. Always buy the adapter cable from the generator manufacturer or a verified solar supplier. Third-party cables from unknown sellers may have reversed polarity internally. For panel selection, see our solar panel charge time guide.
The Three-Step Connection Sequence and Why Order Matters
Step 1 is the panel side. Connect your solar panels together using their built-in MC4 leads. If running two panels in parallel, use MC4 branch connectors to merge the positive leads and the negative leads separately. If running in series, connect the positive of panel one to the negative of panel two. The remaining positive and negative leads are your output pair.
Step 2 is the adapter bridge. Snap the MC4 output leads into your brand-specific adapter cable. Before connecting to the generator, verify polarity with a multimeter. Touch the red probe to the adapter’s positive pin and the black probe to the negative pin. The multimeter should show a positive voltage reading. If it shows a negative reading, the polarity is reversed and the cable must be replaced or rewired. Step 3 is the generator side. Plug the adapter into the DC input or solar input port on your generator. The display should show input wattage within 10 seconds if the connection is correct and the sun is hitting the panels.
The Voltage Check That Saves Your Generator From Overvoltage Damage
Every generator has a maximum PV input voltage printed on the spec sheet or the input port label. Most portable generators accept 11V to 60V input. Before you connect solar panel leads to the generator, add up the open-circuit voltage (VOC) of your panel configuration. A single Renogy 100W panel has a VOC of 21.6V. Two in series produce 43.2V. Three in series produce 64.8V, which exceeds the 60V limit on most portable generators.
In Ontario, cold weather increases panel voltage above the STC-rated VOC. At minus 15 degrees C, a panel rated at 22V VOC can spike to 26V or higher. Three panels in series at minus 15 degrees C can produce 78V, which is 30 percent above the 60V limit. The generator’s safety breaker trips and the unit refuses to charge until you rewire the panels in parallel to reduce the voltage. Always keep total panel VOC at least 15 percent below the generator’s maximum input voltage to account for the Ontario cold spike. For the full cold-weather calculation, see our wire gauge solar panels guide.
The Rockwood Reverse Polarity Near-Miss
A client in Rockwood bought a third-party MC4 to XT60 adapter cable online to connect his Renogy 100W panel to his portable power station. The cable cost $8 CAD and had no brand markings. He brought it to me before connecting because the wire colors looked inconsistent between the MC4 end and the XT60 end.
We tested the cable with a multimeter before connecting it to the generator. The manufacturer had swapped the red and black wires internally at the XT60 connector. The MC4 positive fed into the XT60 negative pin. If he had plugged this cable into his generator, the reversed polarity would have sent current backward through the charge controller input circuit. Depending on the unit, this can permanently damage the input MOSFET or blow the internal input fuse.
This is like trying to jump-start a car with the cables crossed. Red touches the wrong terminal, and the electronics suffer instantly. Always verify polarity with a multimeter before the first connection. Touch the red probe to the positive output pin of the adapter. The multimeter should read a positive voltage matching your panel’s output. A negative reading means reversed polarity. A $15 multimeter protects a $900 generator from a $8 cable that was wired backward.
The Milton Cold-Weather Overvoltage Shutoff
A DIYer in Milton connected three 100W panels in series to a small portable power station during a cold December morning. Each panel had a rated VOC of 22V. In series, the expected combined VOC was 66V. His generator was rated for 60V maximum input. He knew 66V was above the limit but assumed the panels would produce less than rated in winter.
At minus 15 degrees C, the panels produced more voltage than their STC rating, not less. The cold-weather VOC spiked to approximately 26V per panel, producing 78V across the three-panel series string. The generator’s overvoltage protection tripped immediately. The unit refused to accept any solar input and displayed an input error code. He had to disconnect the panels, rewire them from series to parallel, and restart the generator before charging resumed.
He tried to push 80 PSI into a 60 PSI tire. The valve shut down to prevent a blowout. In Ontario, cold weather increases panel voltage. This is the opposite of what most people expect. Parallel wiring keeps the voltage at the single-panel level regardless of how many panels you add. For any portable generator with a 60V input limit, parallel wiring is safer than series in Ontario winter conditions.
The Connect Solar Panel Verdict and the Ontario Winter Angle Advantage
This connect solar panel verdict covers the two setup decisions that determine whether your panel actually charges the generator or sits on the deck producing nothing.
- Always wire panels in parallel when connecting to a portable generator with a 60V input limit. Parallel wiring keeps the voltage at the single-panel level and doubles the current instead. Two Renogy 100W panels in parallel produce 21.6V at 12.4A. The voltage stays safe at any Ontario temperature. Use MC4 branch connectors to merge the leads before the adapter cable.
- Tilt panels at 60 degrees facing south during Ontario winter. Laying panels flat on a deck loses 60 percent of potential output because the sun sits low on the horizon from November to February. Propping a panel against a south-facing wall at 60 degrees can triple January charging speed compared to laying it flat. A snowbank behind the panel adds reflected albedo light for an additional 5 to 10 percent gain. For the full tilt angle calculation, see our solar generator camping guide.
- Always verify polarity with a multimeter before the first connection with any new adapter cable. Buy adapter cables from the generator manufacturer or a verified supplier. Never use unbranded cables without testing. A reversed polarity connection can destroy the charge controller input in under one second. The $15 multimeter is the cheapest insurance in your entire solar setup.
Frequently Asked Questions
Q: Can I use any brand of solar panel with any generator?
A: Yes. The brand of the panel does not matter. All panels use MC4 connectors on the output side. You only need the correct adapter cable for your specific generator brand. The only spec that matters is that the panel’s VOC stays below the generator’s maximum input voltage.
Q: How long can the cable run be between the panel and the generator?
A: Keep the run under 25 feet to minimize voltage drop. Longer runs require thicker wire gauge to maintain charging efficiency. A 50-foot run on thin 18 AWG cable can lose 10 to 15 percent of the panel’s output to resistance in the wire.
Q: Does the panel charge the generator on cloudy days?
A: Yes, but slowly. A 100W panel produces approximately 10W to 20W on a heavily overcast Ontario afternoon. That is enough to keep a phone charging but not enough to meaningfully recharge a 1,000Wh battery in a single day.
NEC Article 690 covers photovoltaic system wiring requirements including connector standards, polarity verification, and maximum voltage limits for PV input circuits. All solar connections must use rated connectors appropriate for the system voltage and current. Current standards are published at nfpa.org.
CEC Section 64 governs solar panel connection requirements and connector safety standards in Ontario. All MC4 connections must use matched-brand connectors to maintain IP67 weatherproofing. The Electrical Safety Authority (ESA) provides current compliance guidelines at esasafe.com.
This build is engineered within the 48V DC Safety Ceiling. Diagnostic logic is based on 20+ years of technical service experience. All structural and electrical installations must be verified by a Licensed Professional and comply with your Local AHJ. See our legal and safety disclosure for full scope.
About the Author
Robert Bertrand spent 20 years as a service advisor in the automotive industry (Lexus and Nissan), where precision diagnostics, wiring integrity, and documentation standards were non-negotiable. He brings that same technical discipline to GridFree Guide, where he researches, tests, and documents off-grid solar systems for Ontario conditions. Based in Rockwood, Ontario, every article is built on verified specifications, manufacturer data, and the real-world climate constraints of Canadian off-grid living.
As an Amazon Associate I earn from qualifying purchases. This site also contains affiliate links to other products and services. GridFree Guide earns a small commission at no extra cost to you.