
How to Size Solar Charge Controller Units and Why Undersizing Wastes Your Panels
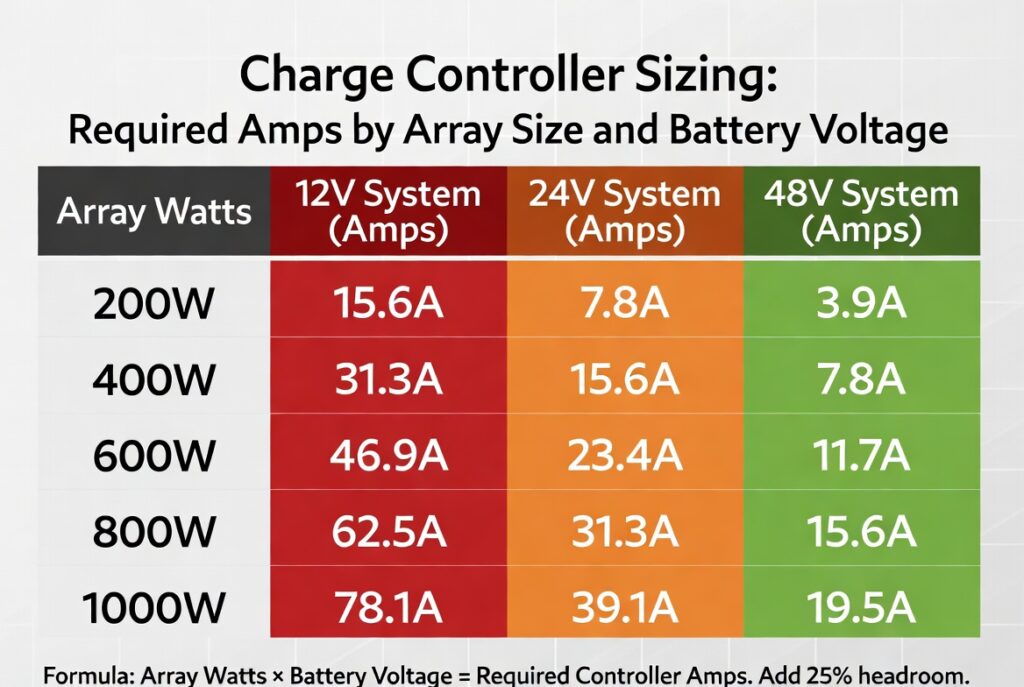
Calculating how to size solar charge controller capacity is the most critical design step before purchasing any component because an undersized controller wastes every watt it cannot process. The sizing formula is straightforward: Array Watts divided by Battery Voltage equals Required Controller Amps. An 800W array on a 12V battery bank needs 62.5A of charge capacity. A 20A controller on that same system limits output to 256W, wasting 544W of panel production you already paid for.
The controller does not reduce panel output intentionally. It simply cannot pass more current than its rating allows. The panels produce full power. The controller clips everything above its maximum amperage and converts the excess to heat inside its housing. The panels are not defective. The controller is too small. This is the most common and most expensive sizing mistake in DIY solar.
Adding 25 percent headroom to the calculated result protects against edge-of-cloud irradiance spikes that briefly push Ontario panels above their STC rating. This article covers the sizing formula with worked examples at three voltages, the headroom rule, the cold-weather voltage check, and why switching to 48V cuts controller cost in half. For a broader overview, see our solar generator Ontario guide.
The Sizing Formula with Worked Examples at Three Voltages
A 400W array demonstrates how system voltage changes the controller requirement. At 12V, the calculation is 400W / 12.8V = 31.3A. You need a 40A or 50A controller. At 24V, the calculation is 400W / 25.6V = 15.6A. A 30A controller works with headroom. At 48V, the calculation is 400W / 51.2V = 7.8A. A 15A controller handles it easily. The same panels, the same total watts, and three completely different controller requirements based solely on battery voltage.
A 1,000W array makes the voltage difference dramatic. At 12V, you need 78.1A, which requires an expensive 100A controller. At 24V, you need 39.1A, which a 50A controller handles. At 48V, you need only 19.5A, which a Victron MPPT 100/30 at $250 CAD handles comfortably. Higher voltage always means a smaller, cheaper controller for the same array. For the full voltage comparison, see our 12V vs 24V vs 48V guide.
How to Size Solar Charge Controller Headroom and the 25 Percent Rule
Never run a controller at 100 percent of its rated capacity continuously. Edge-of-cloud irradiance in Ontario can briefly push panels 10 to 15 percent above their STC rating. This happens when the sun emerges from behind a cloud and the reflected light from the cloud edge adds to direct sunlight for a few seconds. The brief spike can exceed the controller’s rating and trigger overcurrent protection if no headroom exists.
Size the controller 25 percent above the calculated amps. A calculation that yields 31.3A becomes 31.3A x 1.25 = 39.1A after headroom. Buy a 40A or 50A unit. An oversized controller does not waste energy or damage anything. It simply has unused capacity that allows future panel additions without replacing the controller. Buying the largest controller your budget allows is the smartest long-term decision in any solar build.
The Max PV Input Voltage Check for Ontario Cold Weather
The controller’s maximum PV input voltage must exceed the series string open-circuit voltage at the coldest expected temperature. Multiply each panel’s VOC by the number of panels in series, then multiply by 1.175 to account for Ontario’s minus 25 degrees C January mornings. The result must be below the first number in the Victron model name. The “100” in MPPT 100/50 means 100V maximum PV input.
Two panels at 41V VOC in series produce 82V at STC. At minus 25 degrees C, the cold-weather VOC is 82V x 1.175 = 96.4V. A 100V-rated controller has only 3.6V of margin. Adding a third panel would push the string to 144.5V and destroy the controller on the first clear January morning. For the complete cold-weather calculation, see our charge controller wiring guide.
The Milton Undersized Controller Bottleneck
A client in Milton had an 800W solar array on his shed roof connected to a 12V battery bank. He was only seeing approximately 15A of charge current on the controller display. His panels were producing full output in direct sun. He suspected the panels were defective and considered filing a warranty claim.
The panels were fine. He was using a 20A charge controller on a system that needed 62.5A. The controller was limiting the output to its maximum 20A rating, which at 12.8V equals only 256W. He was losing 544W of his 800W array output because the controller could not pass more than 20A regardless of how much the panels produced. He was paying for 800W of panels and receiving 256W of charge.
He had a fire hose volume of fuel trying to flow through a fuel line sized for a lawnmower engine. The pump was fine. The restriction was the line. Replacing the 20A controller with a Victron MPPT 100/50 at 50A capacity tripled his charge current instantly. His battery bank went from taking 8 hours to reach full charge to under 3 hours on the same panels. Understanding how to size solar charge controller units correctly would have saved him the cost of the undersized controller he had to throw away.
The Rockwood 48V Controller Savings
A DIYer in Rockwood was building a 1,200W array for his workshop. He originally planned a 12V system. At 12V, a 1,200W array pushes 93.8A into the battery bank. A controller rated for 100A at 12V costs over $800 CAD.
By switching his battery bank to 48V, the same 1,200W array only needed to push 23.4A. A Victron MPPT 100/30 at $250 CAD handles 23.4A with headroom to spare. He saved $550 on the controller alone by changing the system voltage. The panels, the wire, and the total solar output stayed exactly the same. Only the voltage changed.
Switching from 12V to 48V is like switching from a low-pressure high-volume hydraulic system to a high-pressure low-volume one. The same work gets done with smaller, cheaper components. The pump moves the same amount of fluid but through a narrower line at higher pressure. Understanding how to size solar charge controller units in the context of system voltage turns an $800 problem into a $250 solution.
How to Size Solar Charge Controller Verdict and Which Unit Fits Your Build
This size solar charge controller verdict splits into three profiles based on array size, system voltage, and budget.
- Weekend campers with 200W to 400W arrays should use a Victron MPPT 100/30 at 30A. It handles up to 400W at 12V with headroom. It gives room to add a second panel later without replacing the controller. This is the entry-level professional choice for any small build.
- Off-grid cabin builders with 800W to 1,500W arrays should switch to 48V and use a Victron MPPT 100/50 at 50A. At 48V, a 1,500W array only draws 29.3A, well within the 50A rating. This setup handles a full-size fridge and power tools on a single controller. For conductor sizing, see our wire gauge solar panels guide.
- Mobile office and Starlink users who need efficiency on a budget should use a 20A MPPT on a 24V system. This handles 500W of solar for approximately $150 CAD. It covers Starlink at 75W, a laptop at 65W, and LED lighting with capacity to spare. For battery protection, see our solar system fusing guide.
Frequently Asked Questions
Q: Can I use a controller that is too big for my array?
A: Yes. An oversized controller does not waste energy or damage anything. It simply has unused capacity that allows you to add more panels later without replacing the controller. Buying the largest controller your budget allows is a smart long-term strategy.
Q: What is the difference between PWM and MPPT?
A: PWM is older technology that directly matches panel voltage to battery voltage and wastes the difference as heat. MPPT converts high panel voltage into high battery current and is approximately 30 percent more efficient. Only buy MPPT controllers for any installation where efficiency and performance matter.
Q: Does the charge controller handle the inverter load?
A: No. The charge controller only manages incoming power from the solar panels to the battery. The inverter pulls power directly from the battery bank independently. The controller and inverter are separate devices connected to the same battery but serving opposite functions.
NEC Article 690 covers photovoltaic system charge controller sizing and overcurrent protection requirements. Controllers must be rated for the maximum short-circuit current of the connected PV array with appropriate safety margins. Current standards are published at nfpa.org.
CEC Section 64 governs charge controller sizing and PV system overcurrent protection requirements in Ontario. All controllers must be rated for the maximum array output with headroom for cold-weather voltage increases. The Electrical Safety Authority (ESA) provides current compliance guidelines at esasafe.com.
This build is engineered within the 48V DC Safety Ceiling. Diagnostic logic is based on 20+ years of technical service experience. All structural and electrical installations must be verified by a Licensed Professional and comply with your Local AHJ. See our legal and safety disclosure for full scope.
About the Author
Robert Bertrand spent 20 years as a service advisor in the automotive industry (Lexus and Nissan), where precision diagnostics, wiring integrity, and documentation standards were non-negotiable. He brings that same technical discipline to GridFree Guide, where he researches, tests, and documents off-grid solar systems for Ontario conditions. Based in Rockwood, Ontario, every article is built on verified specifications, manufacturer data, and the real-world climate constraints of Canadian off-grid living.
As an Amazon Associate I earn from qualifying purchases. This site also contains affiliate links to other products and services. GridFree Guide earns a small commission at no extra cost to you.